Video editing: Photos Windows 10
On Windows 10, Photos is an essential app designed to help you to organize your pictures and videos. It also includes a powerful video editor which you can use to create videos automatically, or from scratch with music, text, and motion, and modern features, such as 3D effects.
This lesson outlines all the steps needed to know, to creating and editing a project from start to finish.
How to create video project manually using Photos
PHOTOS APP MAIN INTERFACE
To create a video project from scratch using the Photos app, use these steps:
1) Open Photos
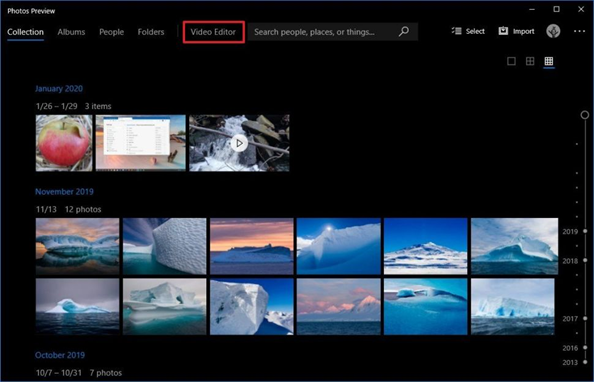
2) Click the Video Editor tab
3) Click the New video project button
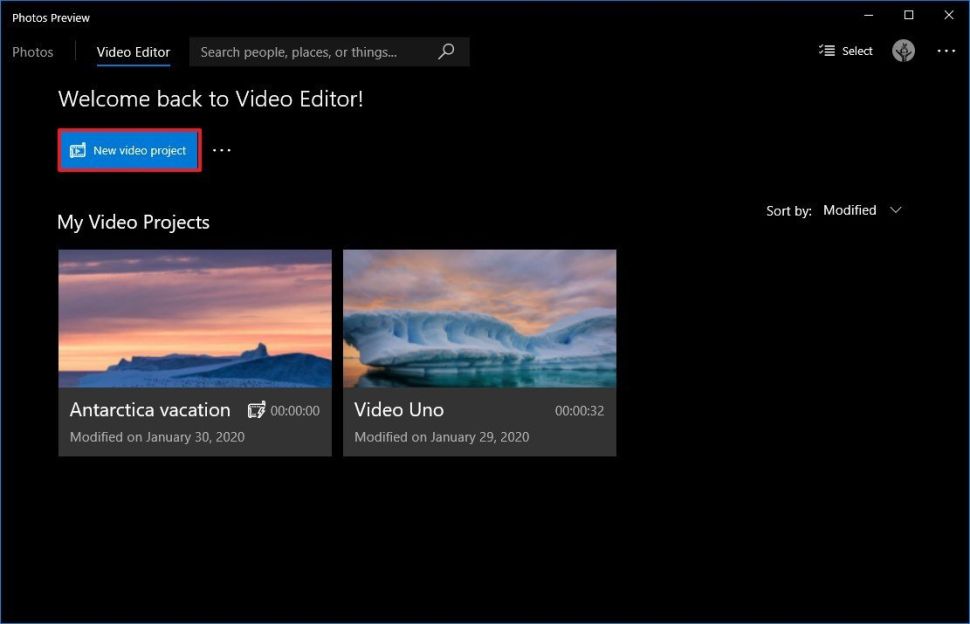
4) Specify a descriptive name for the project
5) Click the OK button
After you complete the steps, you go in to the video editor interface where you can start adding content to the storyboard with various options, including text, duration, motion, 3D effects, and more. The video editor interface also has a live preview that you can use to check the process before exporting the video.
Descriptive name of the project (in this example video uno) can be changed in the video editor interface clicking the pencil tab. Video editor interface is explained in the following.
PHOTOS VIDEO EDITOR INTERFACE
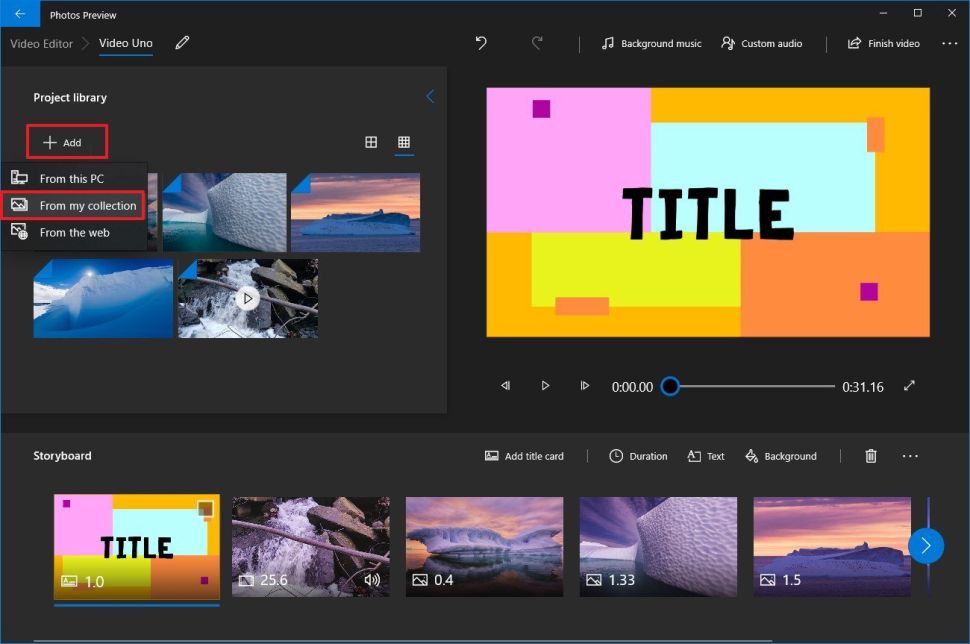
Once created a new project, you’ll be presented with the video editor experience, which is made up of three main sections.
First the “Project library” at the top-left side, which is the place where you’ll add the images and videos that you’ll be using in the project.
Second, At the bottom, the “Storyboard” section, which is where you can drag and drop the media elements to build your video. Also, depending on the content you’re editing, you’ll get a different set of features you can use to edit.
Third, On the top-right side, you can preview your project with all the current changes, and as you play the video, you’ll see the timeline highlighting the card being played.
Adding media elements
To add new media files to the video project, use these steps:
1. Under the “Project Library” section, click the Add button in the top-left corner.
2. Select the From my collection option. The video editor also allows you to import files that are not part of the Photos app, such as from an external drive, using the “From this PC” option, and you can even use the “From the web” option to download images from Bing.
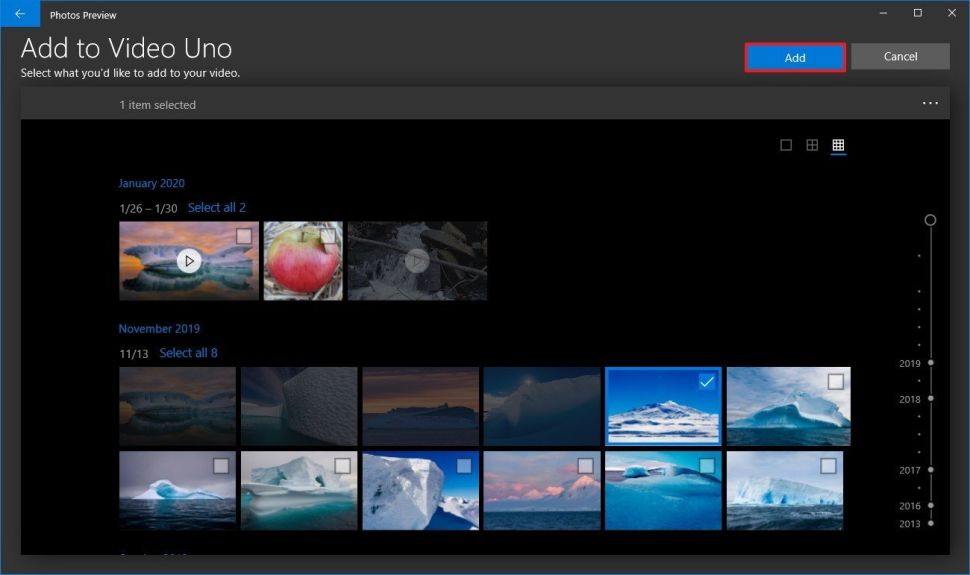
3. Select the pictures and videos you want to be part of the project.
4. Click the Add button from the top-right corner (valid for the three options)
5. Check the media elements to begin your video.
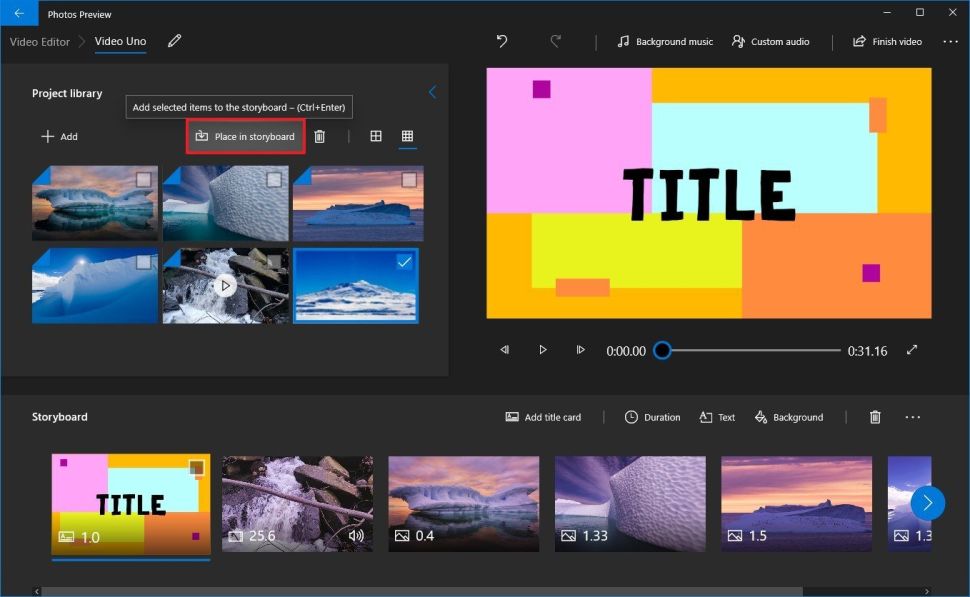
6. Click the Place in storyboard button. (You can also drag-and-drop the files to the storyboard) Once in the storyboard you can change order of media elements and modify them as we will see in next section.
While editing a video, you can always add more media files, clicking the Add button, and you can remove files by selecting the items and clicking the Trash button from the top-right.
Adding duration
As you add media to the storyboard, you’ll notice that every file includes a default time duration. If you want the media to have a shorter or longer period, use these steps:
2. Click the Duration button from the toolbar.
2. Click the Duration button from the toolbar.
3. Select a time duration, or specify a time range in seconds.
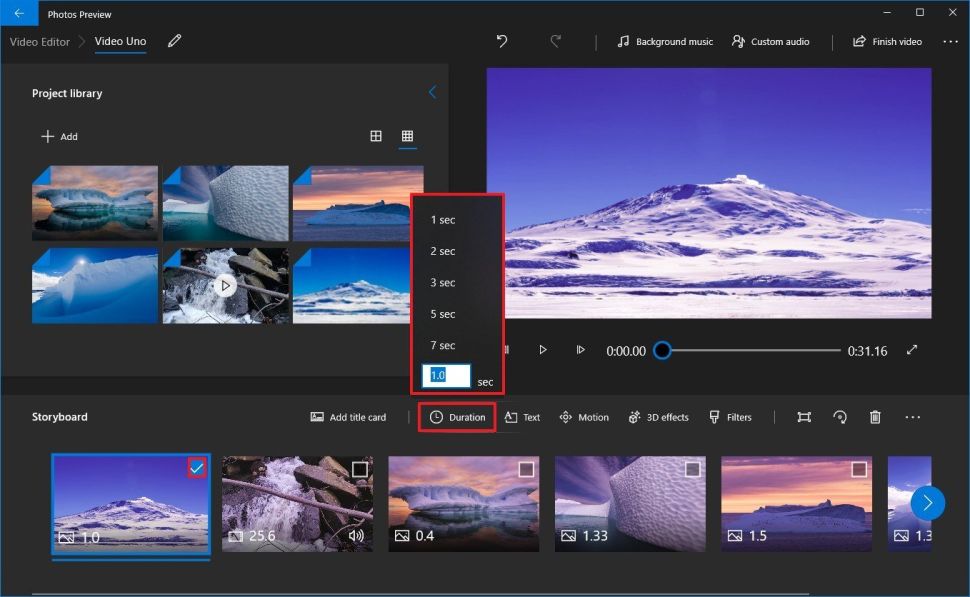
After you complete the steps, the element will play in the video the time you specified. If you have multiple elements in the storyboard, you may need to repeat the steps to change the duration for the remaining items.
Adding text
You can also add a custom title or caption to an image or video using these steps:
1. Under the “Storyboard” section, select the media element.
2. Click the Text button from the toolbar.
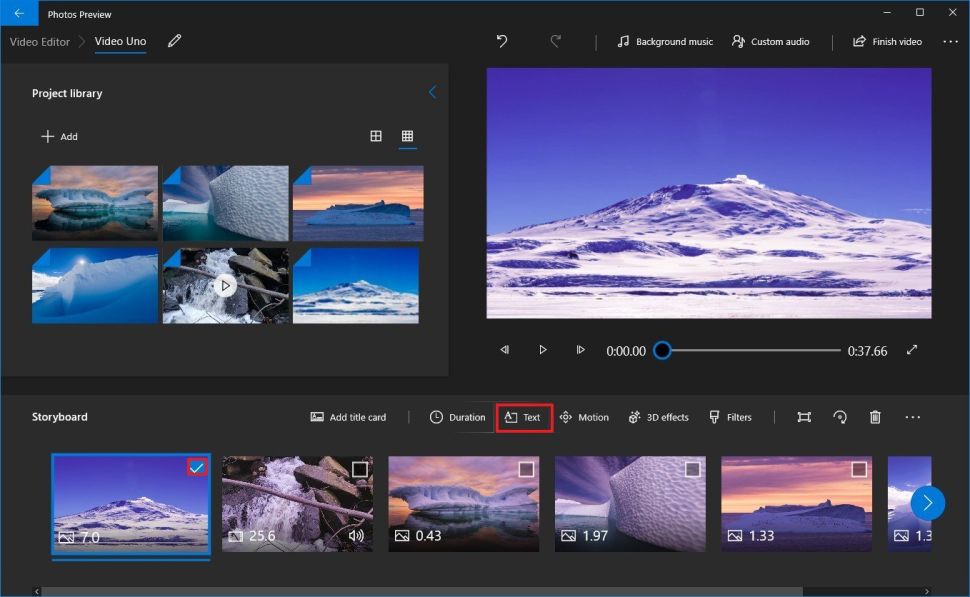
3. Use the Text interface to insert custom text on selected media element
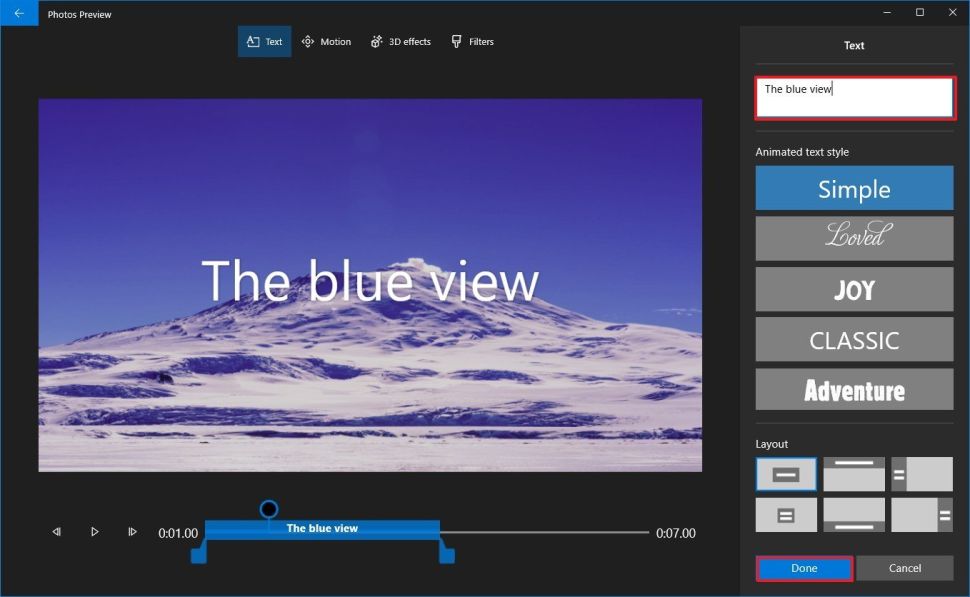
4. Select the text style from the list.
5. Select the location using the Layout options.
6. Use the controls on the left side to specify the text duration, starting and ending points and preview the changes.
7. Click the Done button.
Once you complete the steps, the text will apply to the element for the time you specified.
Adding motion
The video editor in Photos also lets you add camera motion styles to images and videos with these steps:
1. Under the “Storyboard” section, select the media element.
2. Click the Motion button from the toolbar.
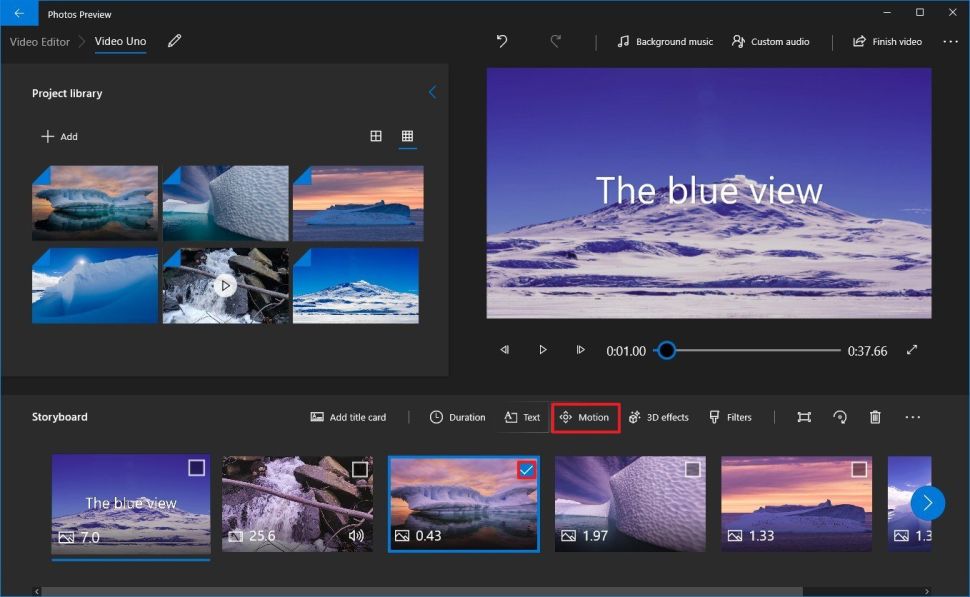
3. Select a motion effect for the image or video, such as Zoom in center, Zoom in right, Pan left, Tilt up and others.
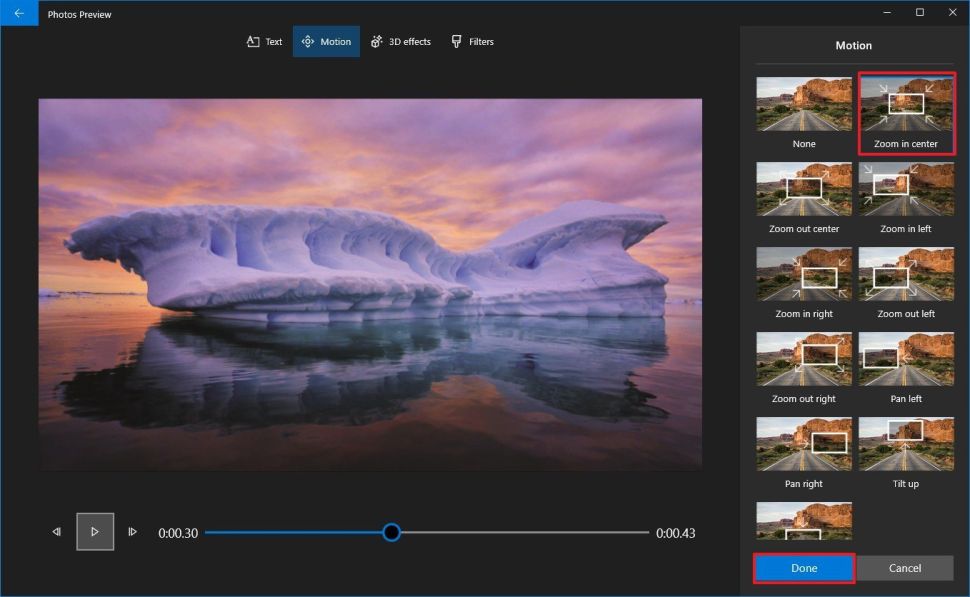
4. Use the controls on the left side to preview the changes.
5. Click the Done button.
After you complete the steps, you may need to repeat the steps to apply the same or different motion effect to other parts of the video.
Adding filters
Using the video editor, you can even add filters to change the look of the images or video clips in your project using these steps:
1. Under the “Storyboard” section, select the media element.
2. Click the Filters button from the toolbar.
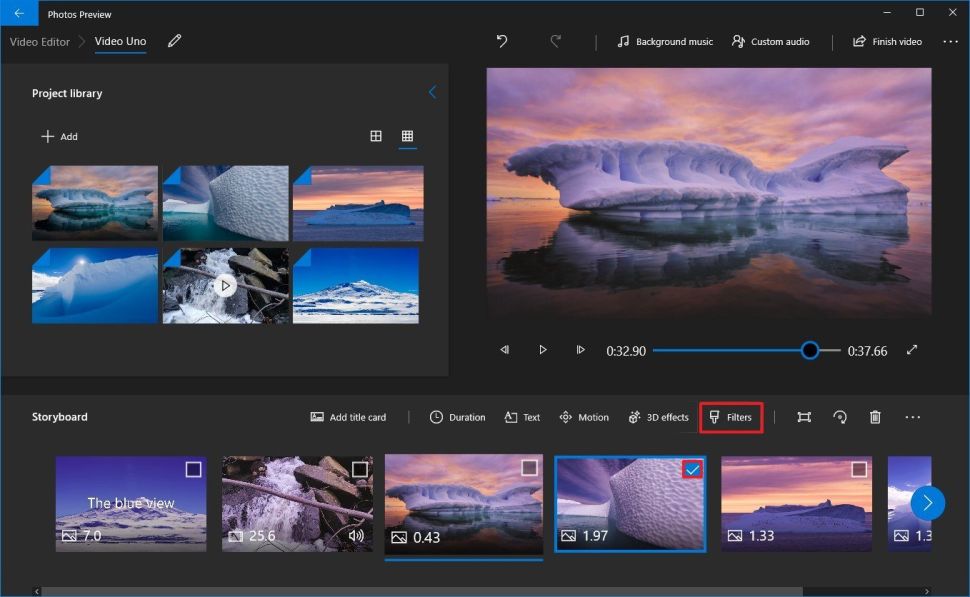
3. Select one of the 14 filters available, such as Classic, Adventure, Sepia, Inky, Loved, Pixel, etc.
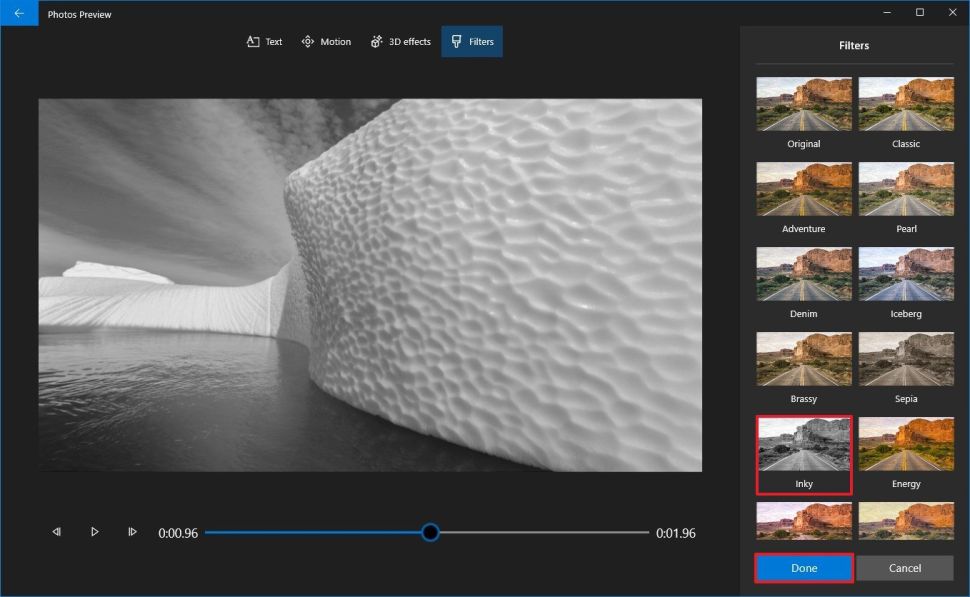
4. Use the controls on the left side to preview the changes.
5. Click the Done button.
After you complete the steps, the filter will apply for the media file. If you have multiple parts of the project to use a specific filter, you’ll need to repeat the steps for each element.
Adding trim, split & speed
The Photos app editor also includes the ability to trim, split, and control the speed of a video clip.
Trimming
To trim a video with the Photos app editor, use these steps:
1. Under the “Storyboard” section, select the video clip.
2. Click the Trim button from the toolbar.
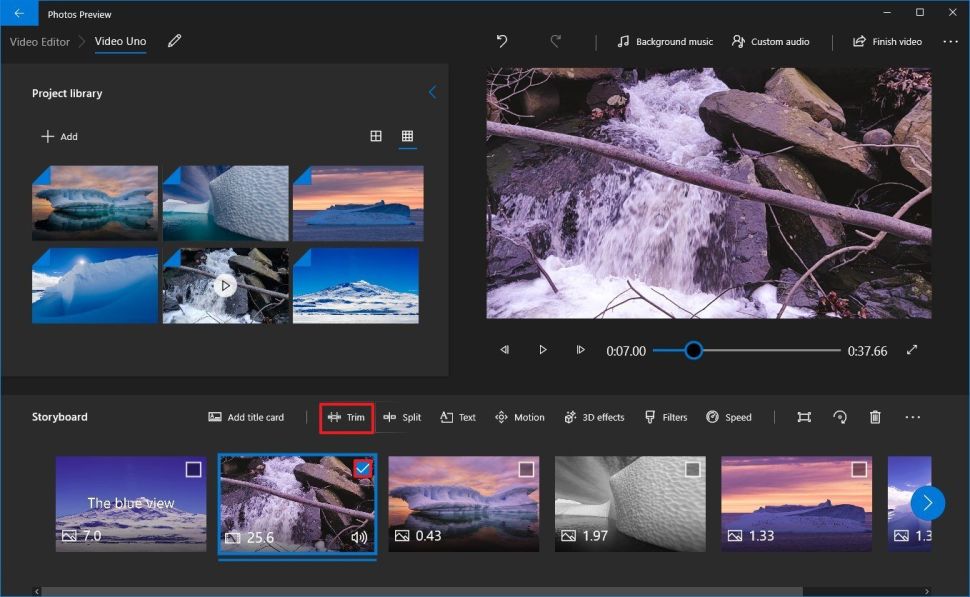
3. Quick tip: When inserting a video clip to the storyboard, it’ll not play the full length. If you want to include the entire video, you need to select the whole length using the trim option.
4. Click the Done button.
Once you complete the steps, only the video selection you specified will be included in the project.
Splitting
To split a video clip into two or more parts with the Photos app, use these steps:
1. Under the “Storyboard” section, select the video clip.
2. Click the Split button from the toolbar.
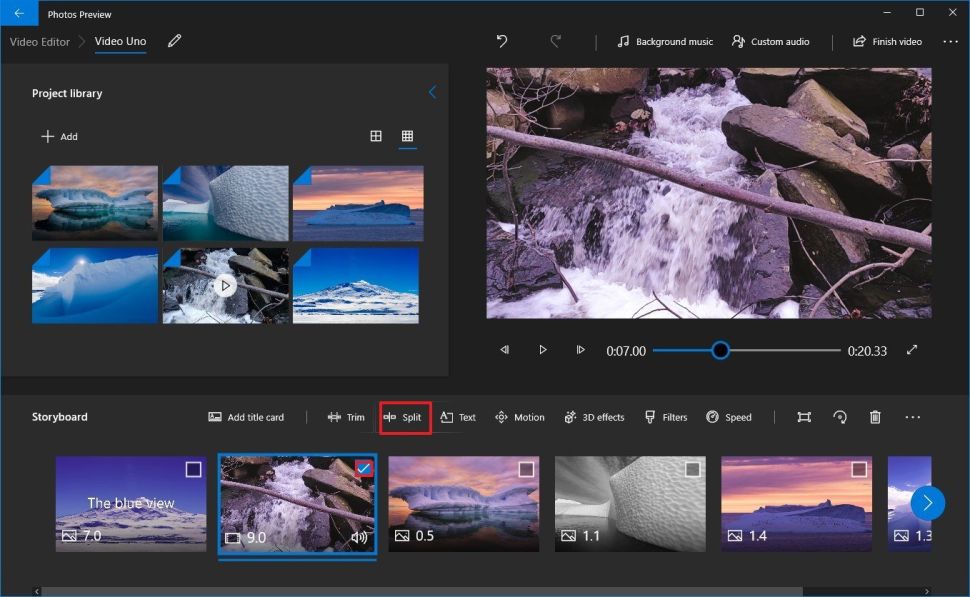
3. Use the slider to choose the length of the splitted clips.
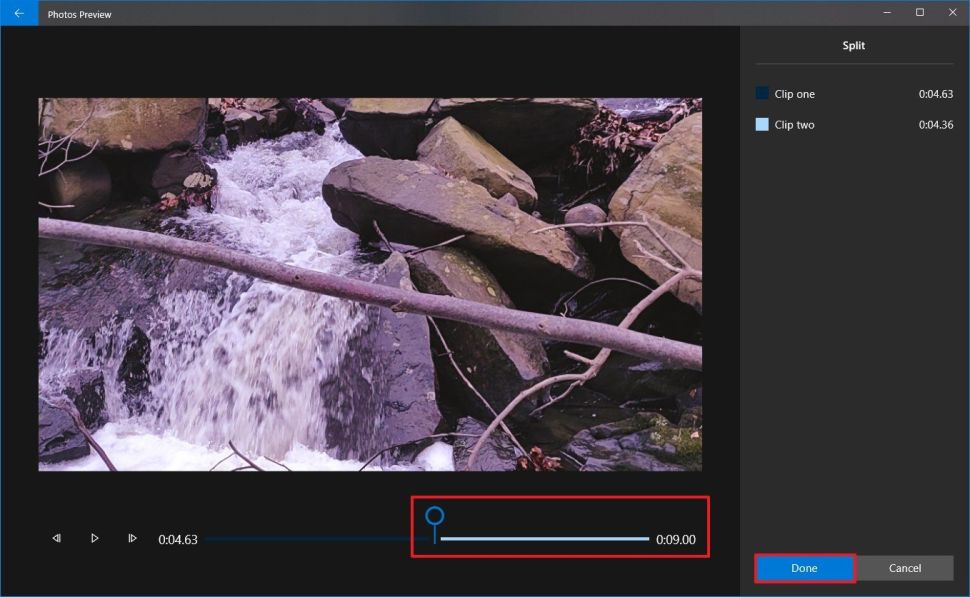
4. Click the Done button.
After you complete the steps if you repeat again, you’ll end up with a video divided into multiple parts. You can remove now those clips you do not like. This option is interesting when you only need a part from other videoclip. Unlike Trim you can erase those parts you don not like, so final video becomes a lighter archive.
Speeding
To slow down or speed up a video clip in the storyboard, use these steps:
1. Under the “Storyboard” section, select the video clip.
2. Click the Speed button from the toolbar.
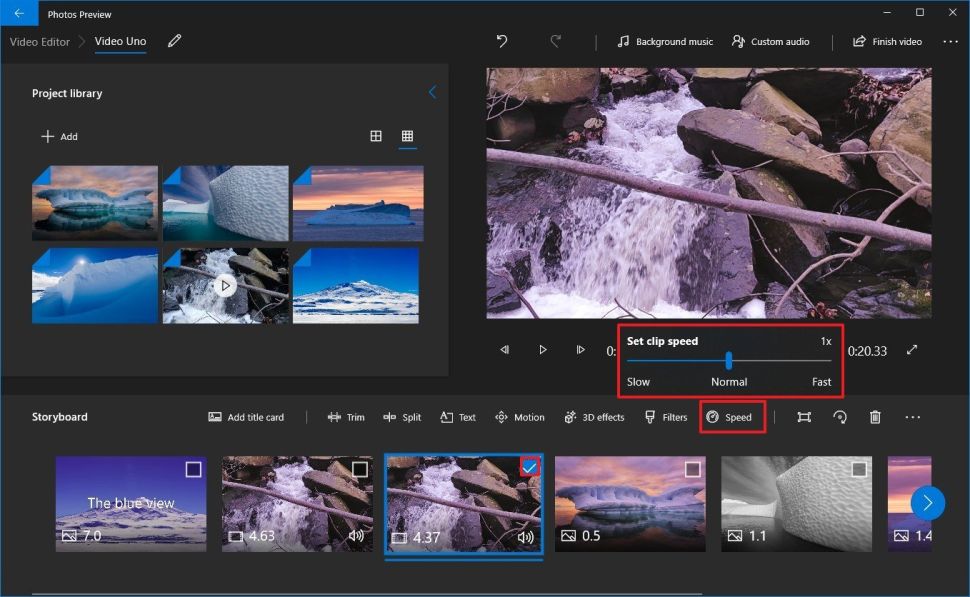
3. Use the slider to choose the speed of the clip.
Once you complete the steps, the video will play using the speed you selected.
Adding title cards
While working on a video project, adding a title or custom text with a background is an excellent way to break the video into sections or mark a change in the scene. To add title cards to a video project in the Photos app, use these steps:
1. Under the “Storyboard” section, click the Add title card button.
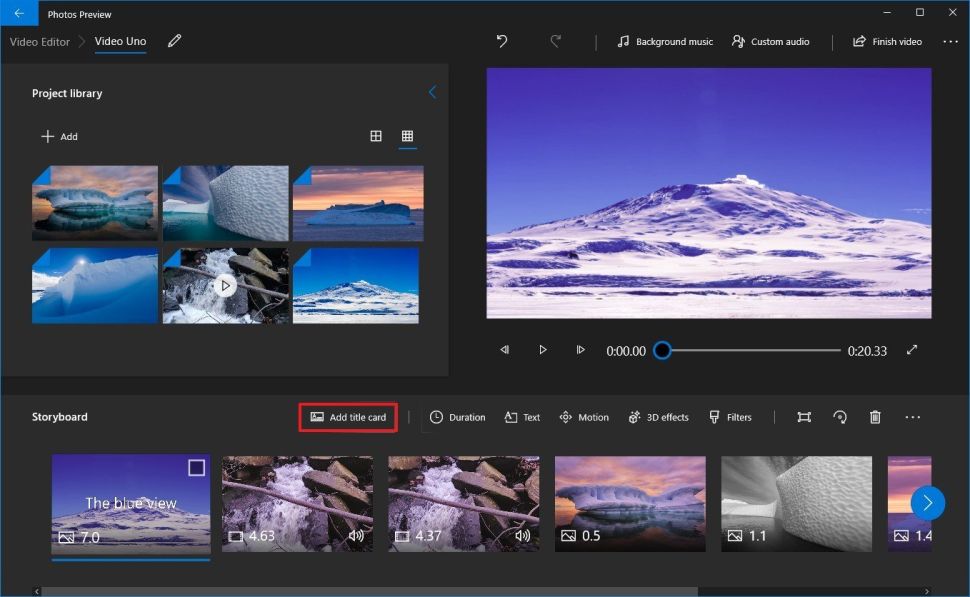
2. Click, hold, and drag the card to the location you want to show it.
3. Select the title card to focus and reveal the options. Always is possible to right-click the card to see the available options.
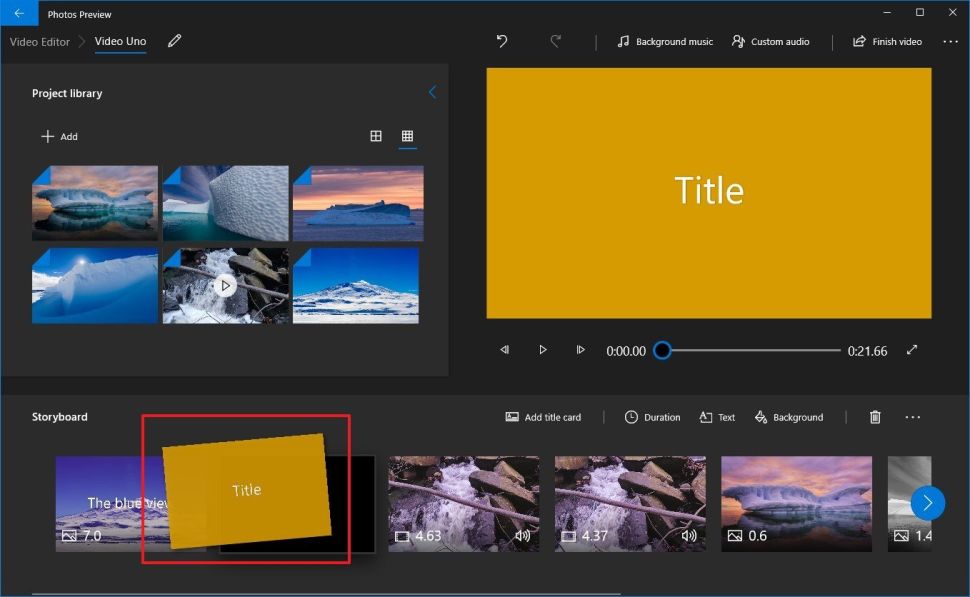
4. Click the Text button from the toolbar.
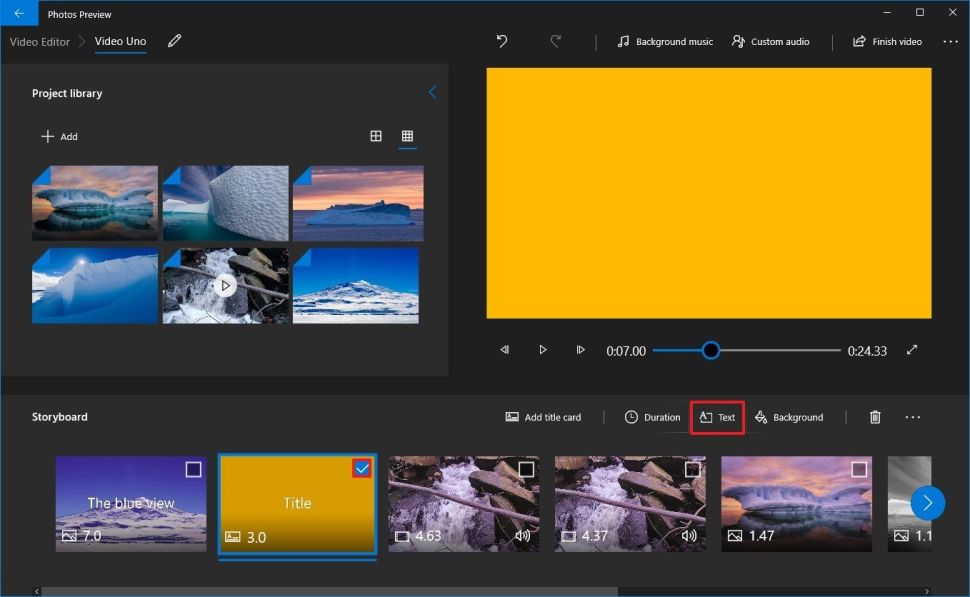
5. Use the Text box to insert custom text
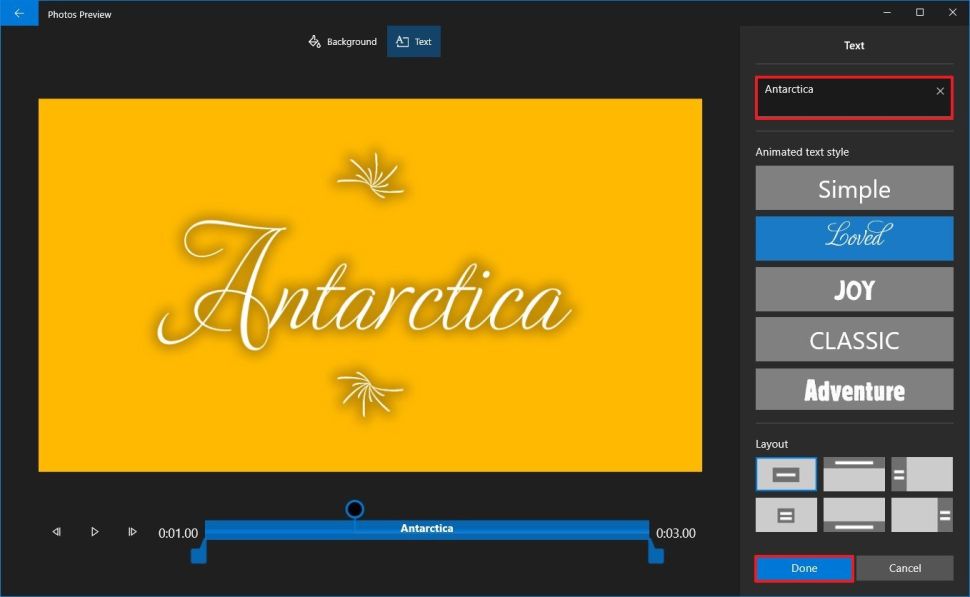
6. Select the text style from the list.
7. Select the location using the Layout options.
8. Use the controls on the left side to specify the text duration and preview the changes.
9. Click the Done button.
10. (Optional) Click the Background option from the toolbar.
11. Select the background color.
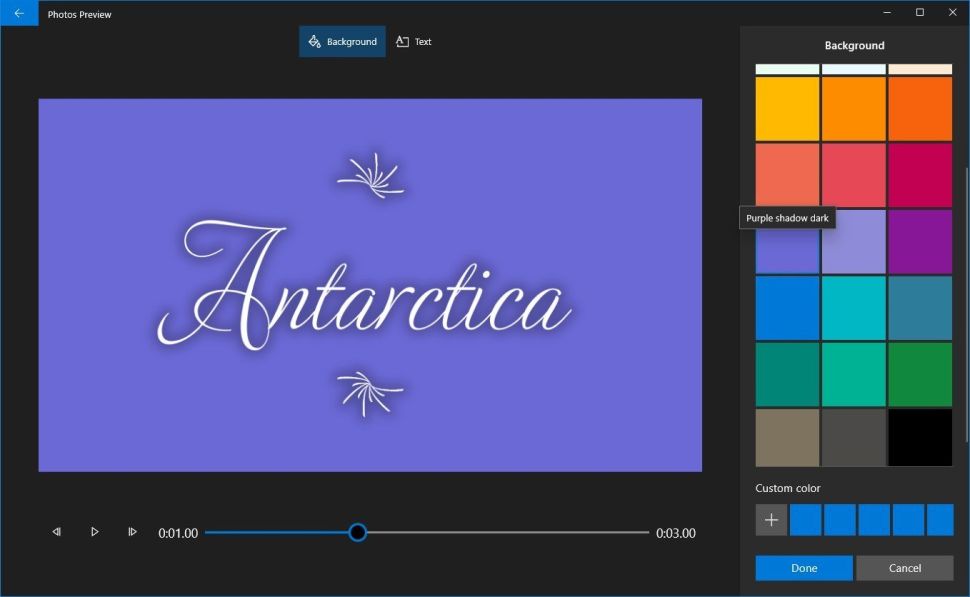
12. Click the Done button.
If you want to add a custom image as the background, then add the image to the project, and then use the Text option to add the title or content you want.
Adding audio
The Photos app editor includes the ability to insert background music and custom audio (such as narration) to add some life to your video.
Background music
To add background music to your project, use these steps:
1. Click the Background music button from the top-right corner.
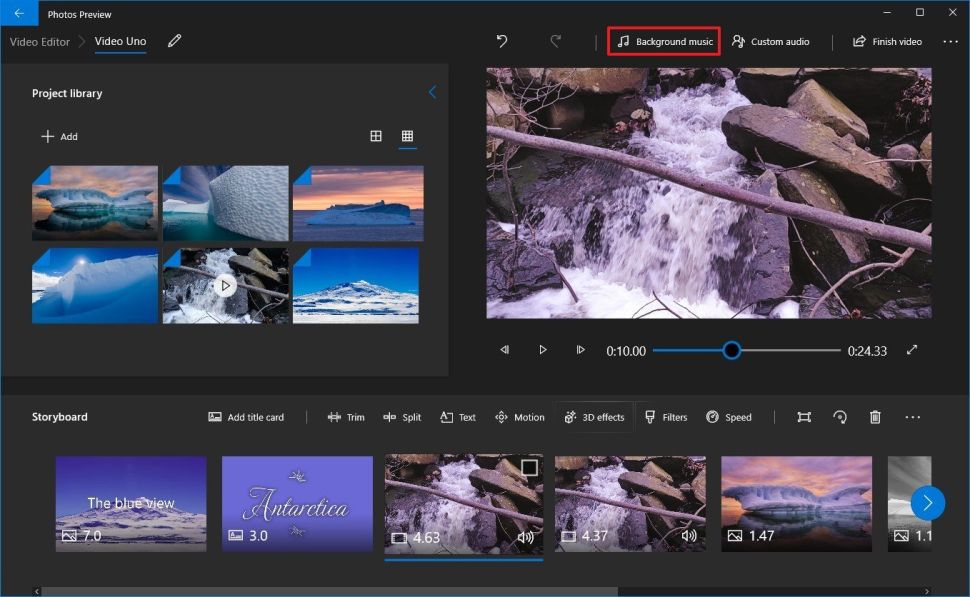
2. Select the soundtrack you want to use. (You can click the Play button to preview the music.)
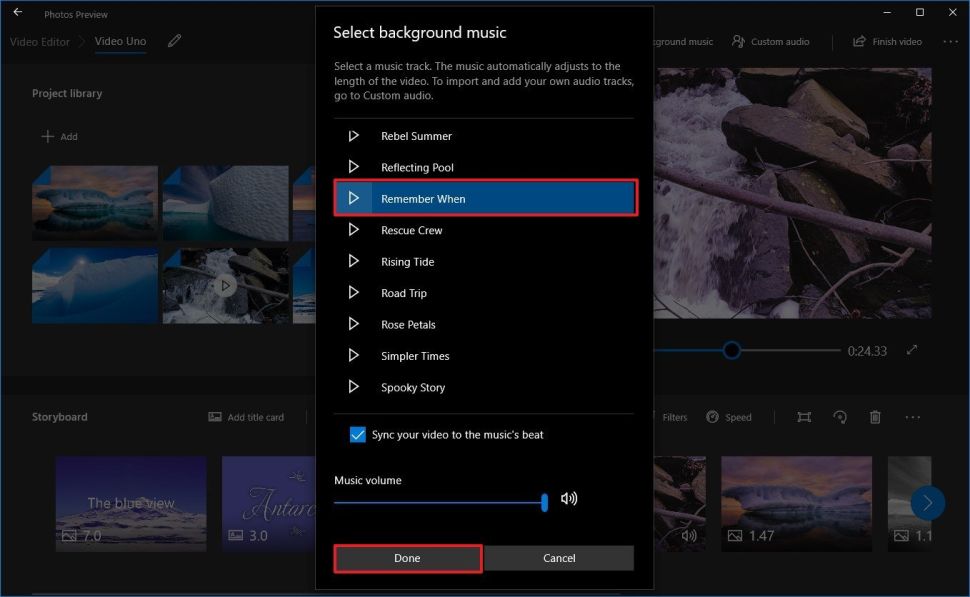
3. Check the Sync your video to the music’s beat option.
4. Set the music volume using the slider option..
5. Click the Done button.
After you complete the steps, the soundtrack will adapt automatically to the full length of your video.
Custom audio
To add custom audio or narration to your video project, use these steps:
1. Click the Custom audio button from the top-right corner.
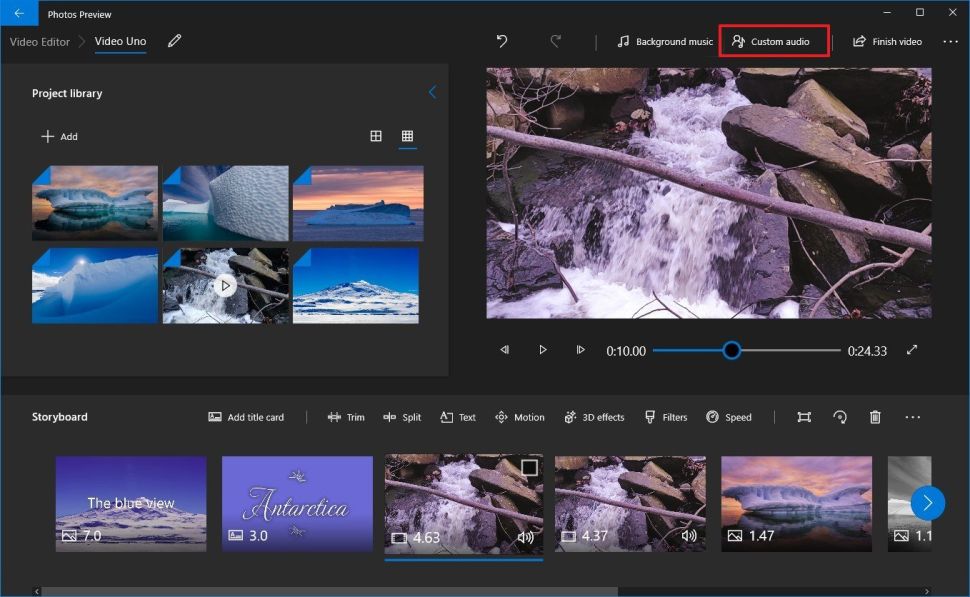
2. Click the Add audio file button.
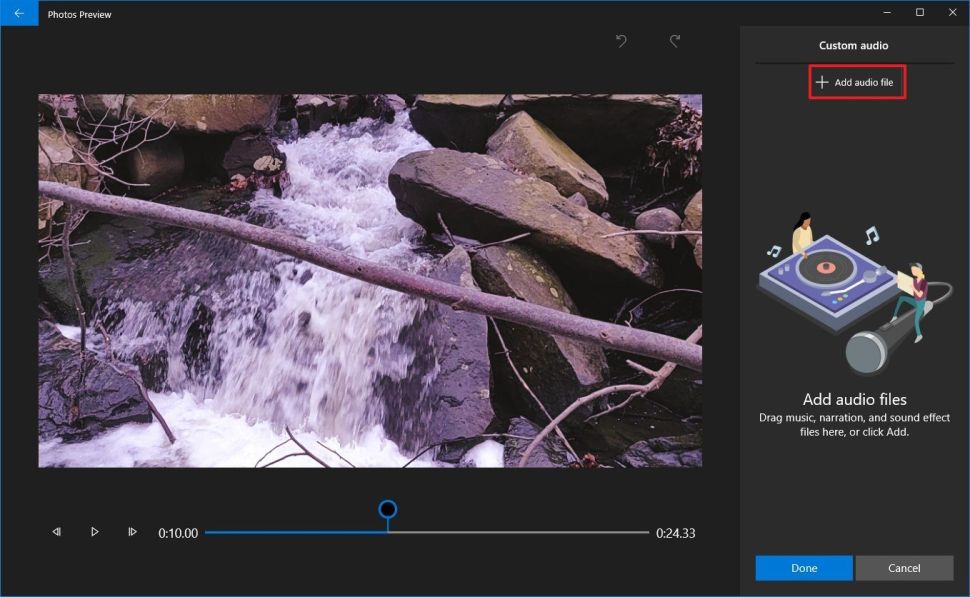
3. Select the audio track from a folder in your PC
4. Click the Open button
5. Use the controls on the left side to specify where the audio should play.
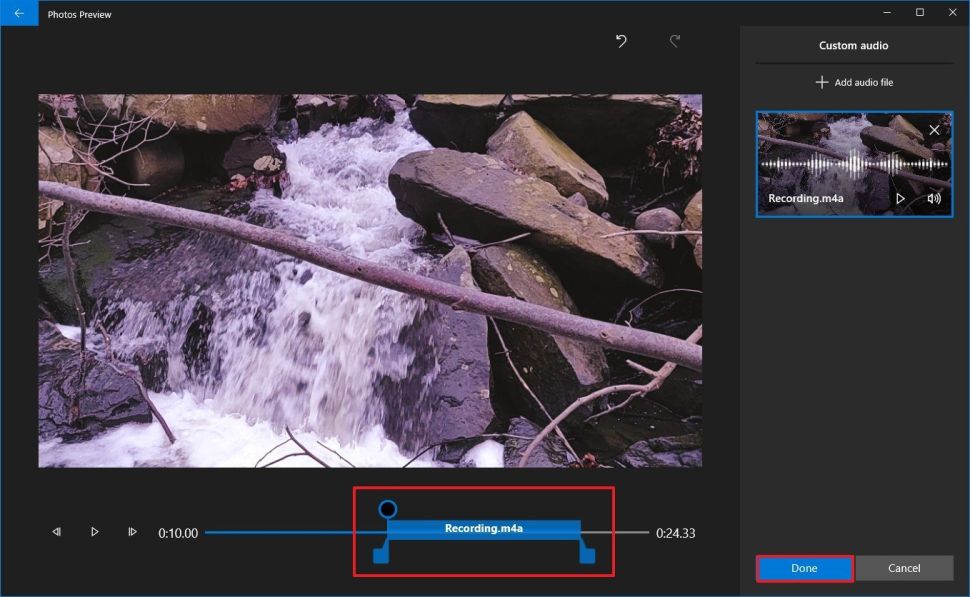
6. Click the Done button.
Once you complete the steps, the narration or custom music track will apply to your project.
If you need to add narration, you can use any voice recorder app to create a recording that you can then import to the project.
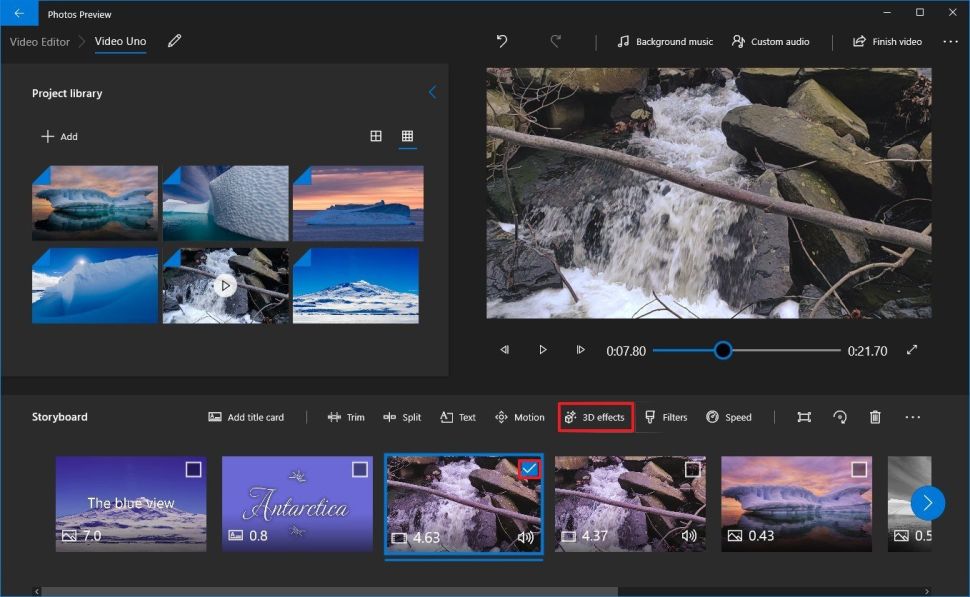
Adding 3d Effects
1) Click the 3D effects button from the toolbar.
2) Click the Effects tab and choose one of them (Bubbles everywhere)
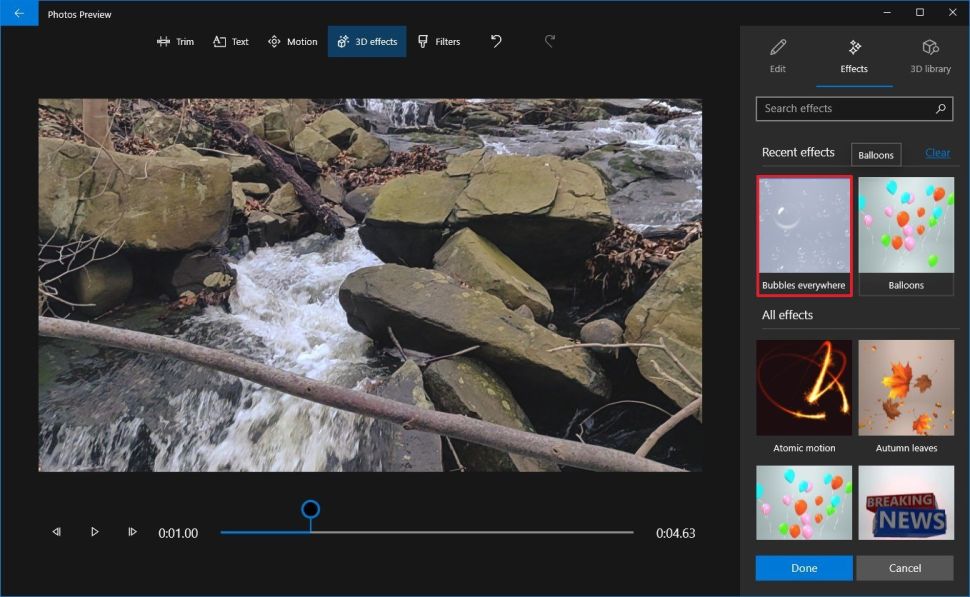
3) Select the 3D effect into the preview on the left
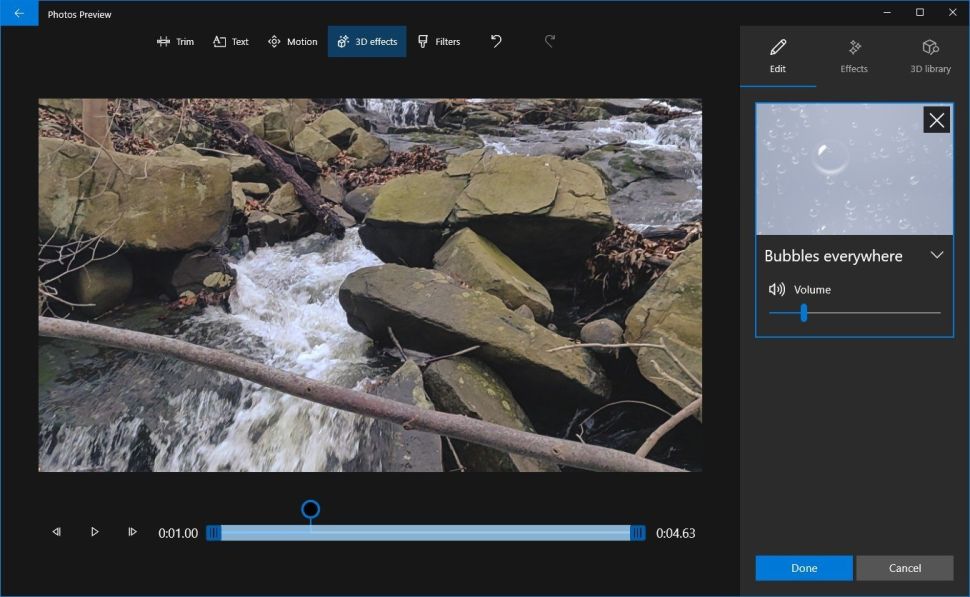
4) Use the controls on the left side to adjust the duration of the effect.
5) In the same way we can add objects from the 3D library tab
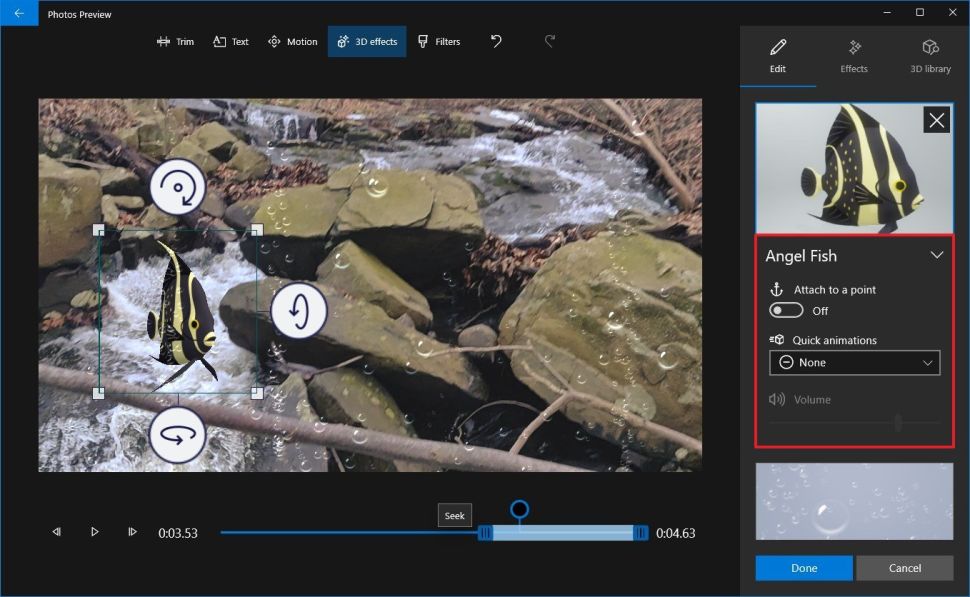
6) Use the controls to attach the element to an object in the video clip. So, even if the camera was moving during the recording, the 3D effect will stay in the correct place.
7) (Optional) Use the Quick animations drop-down menu to select an animation (if applicable).
8) Click the Done button
FINISHING VIDEO
At this point we have finished our video project. What we will do is export it to a known format like the ones studied in the first lessons. In this case, the windows 10 photos app generates a video with MP4 extension. Dependiendo de la calidad de vídeo elegida, el archivo final tendrá más o menos bytes.
To generate this file we first click on the tab finish video.
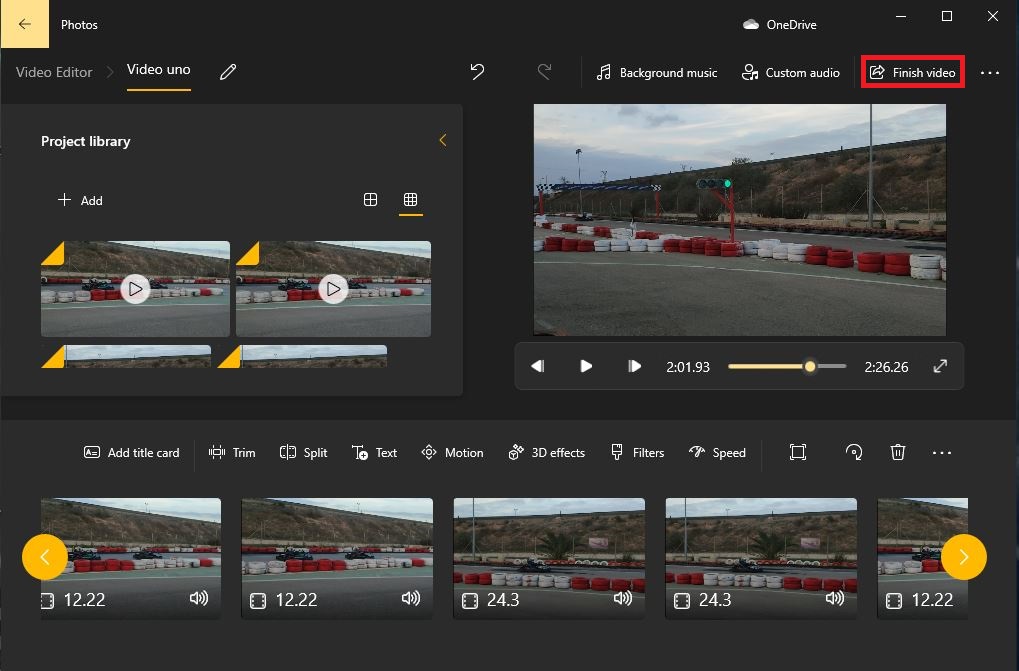
Then we choose video quality
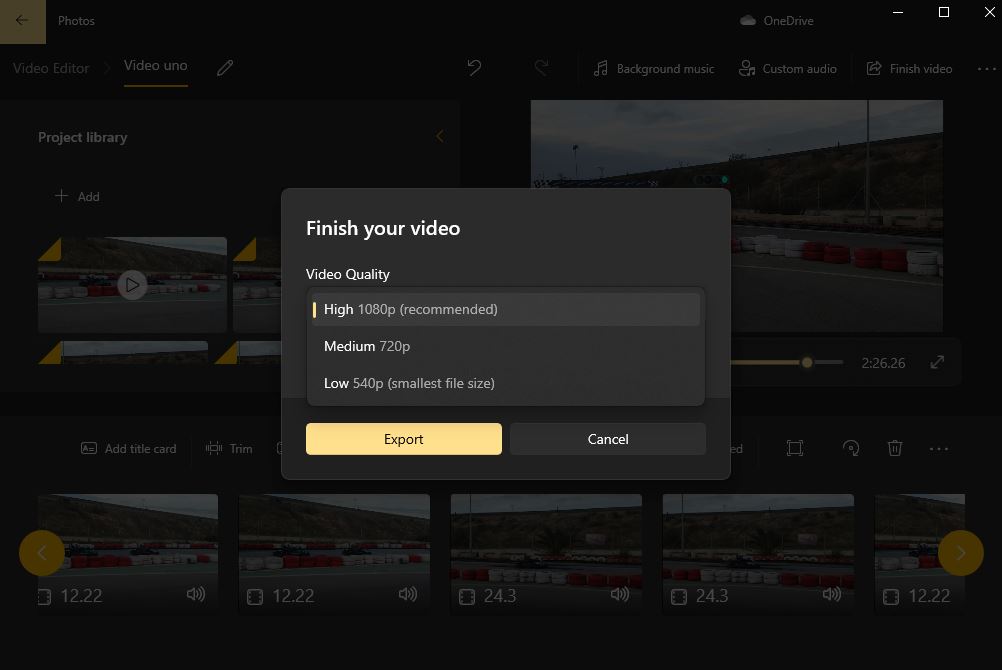
And finally, we click on the export tab, which takes us to a folder on our PC to save the MP4 file with the same name as our project, although we can rename it.


