


Making a videogame. Flappy Bird
In this lesson, we will apply everything we have learned to create our first game, and there is nothing better than starting with one of the most successful games of the last decade: Flappy Bird.
The gameplay of Flappy Bird is simple: Move your character vertically to avoid obstacles that appear randomly on the stage. As the character advances, his score will increase, and he will lose if he hits an obstacle, as shown in Figure 1:
Figure 1. Original Flappy Bird game.
In this lesson, we will develop our own version of the game, where we will work on the following concepts:
- Development of animated sprites and scenery
- Development of game screens
- Procedural obstacle generation
- Sound effects and scoring
- Implementation of the game logic
- Event and control management
DEVELOPMENT OF ANIMATED SPRITES AND SCENARIOS
The first step in developing our game is to have all the elements that will be shown in the interface, i.e. the main character as well as the obstacles and scenarios.
We will start with the game’s wallpaper. At this point we have two options:
1) USE OF THE DEFAULT SCRATCH FUNDS
As described in previous lessons, Scratch has a large gallery of predefined images that we can use in our projects.
A distinction must be made between two main groups:
Characters and obstacles:They overlap with the background and are elements interacted directly by the player.
Wallpapers:They are generally static images, with which the player does not interact. However, many games choose to add animations and effects to the background in order to enhance the gaming experience.
Among these effects, we can highlight the so-called “parallax scroll”, which is used to simulate the relative movement of the characters, based on the displacement of the screen background. As can be seen in Figure 2, there is a sense of movement of the ship even though it actually remains static at the same point on the screen, with the background moving.
Figure 2. Parallax scroll effect.
At this point, we will start by adding one of the predefined wallpapers in Scratch, as shown in Figure 3.
Figure 3. Default wallpaper.
Although the images provided by Scratch are default, this does not prevent us from modifying them to suit our needs.
As shown in Figure 4, we can move, move and resize any element, even duplicate them and change their colour.
Figure 4. Editing default backgrounds.
2) IMPORTING FROM AN EXTERNAL FILE
Scratch also allows you to draw them from its own interface, but it is limited to drawing simple polygonal shapes, so it is not the best option if you want to create a game with a professional finish.
In a game, it is common for there to be different backgrounds depending on the scenario or level in which our character is, as well as specific backgrounds for the game menu, among others.
In this project, we are going to use the same background for all the menus and scenarios of the game, but we are going to customise them a bit.
As we need to define both the game background and the main menu background, as well as a specific GAME OVER background, we will duplicate the background we have already created and assign them a name, as shown in Figure 5.
Figure 5. Duplicate backgrounds and rename them.
We will now add some text to personalise our screens (Figure 6).
Figure 6. Add text to wallpapers.
Now that we have the backgrounds ready, it’s time to start adding the rest of the elements, starting with our protagonist. To do this, we will select one of the included Sprites, as shown in Figure 7.

Figure 7. Character Selection.
As we have seen in previous lessons, the character is composed of different images to simulate its movement. These images can be edited according to our needs using Scratch’s own interface, as shown in Figure 8, where we can move, change colour and redefine the outline of the different parts that make up the character.
Figure 8. Editing a Sprite.
Finally, we will add the obstacle of the game: the pipe. To do so, we can either import a generated one from the interface itself (Figure 9) or import it (Figure 10).
Figure 9. Draw pipeline.
Figure 10. Use imported pipe.
CONTROLLING OUR CHARACTER AND THE LOGIC OF THE GAME
Once we have defined the graphical elements that will make up our game, it is time to start programming it.
As we know, the game is started when the user activates the green flag (Figure 11), but we must indicate what we want to be executed at the start of the game, otherwise it will display the last scenario and character we have selected.

Figure 11. Example of game initialisation by green flag.
In our game, we want the main menu we created earlier to be displayed on start-up. For now, our menu will not have any buttons, we will add that later, so for now we just want the game to start after a few seconds.
We must remember that each element on the screen (characters, obstacles, scenery…) can contain its own code, so depending on the element we want to control, we will have to program in one block or another.
In this case, as we want to define the logic of the screens, we will click on one of the backgrounds we have created to start programming them.
To do this, we define the blocks shown in Figure 12, where we show the screen we have called “main_menu”, and we indicate that we want to remain on this screen for a certain time, for example 5 seconds.
A good practice when developing any game is to control the start by means of a flat or event, that is to say, by means of an activation variable whose value will change to indicate to the rest of the elements of the programme that they should start. This is achieved through the “broadcast” block, to which we add a name, which will be the name of the triggering event. In our case, we will name it “Start”.

Figure 12. Starting block of the game.
Now that we’ve talked a bit about events, let’s implement the event that will be triggered when we lose the game. To do this, we define the blocks shown in Figure 13, where we assign the event the name we want, for example “Game_over”. When this event occurs, we want the game screen to change and stop the execution of the game, which we do by using the “Stop all” command.
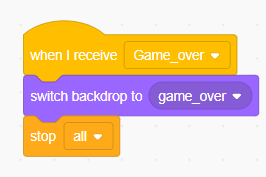
Figure 13. Game Over event.
This whole process can be seen in Figure 14.
Figure 14. Summary of steps 12 and 13 for menu logic programming.
Now we are going to work with our character by clicking on its icon. As the default model is very large, we will change its dimensions as shown in Figure 15.
Figure 15. Change the scale of the character.
The character must start at specific coordinates on the screen to give the player enough time to visualise the various obstacles. This can be done in two ways: by moving the player manually (Figure 16A) or by code (Figure 16B).

Figure 16. Character location. (A) manually (B) programmatically.
Our character is a bird that must dodge obstacles as it flies, so we have to make it flap its wings at a certain speed as soon as the game starts.
This effect is achieved by constantly swapping character sprites. The “next costume” component is available for this purpose. Since flapping should be as natural as possible, we will introduce a certain delay between each animation, as shown in Figure 17.
Figure 17. Character animation.
The character flaps correctly, but for now he is floating in the air, so we are going to make him affected by gravity. To do this, we will implement a new block (Figure 18) that will be executed when the “Start” event is received (although it can be done within the block we have created in Figure 16A, but this way it is more intuitive).
Figure 18. Add gravity effect
The character only moves vertically. To simulate the action of gravity, we must make our protagonist move vertically downwards by a certain number of pixels, i.e. on the y-axis.
As we can see in Figure 18, for a value of +10, the character climbs very fast until it goes out of the window. To solve it, we will change it to a value of -2. As we want gravity to always act on our character, we will use a loop.
We have already made the character fall due to the action of gravity, but now we are going to make the character rise a few pixels when the player presses the SPACE key. To do this, we will modify the previous block as shown in Figure 19 to constantly monitor whether the player presses the key, in which case, we will ascend +5 pixels, while in the case of not pressing the key, we will fall due to the action of gravity.

Figure 19. Character flight control.
We have already defined the basic controls of the game, but we have not defined what will happen if our character falls off the screen. As in the original game, if such an event occurs, we must write off the game and stop the game.
To implement it, we define a new block (although we could define it within the previous block), where we will constantly check if the selected character touches any of the edges of the screen and if so, we will make the character disappear and change the screen to Game Over, while stopping the game, as shown in Figure 20.
Figure 20. Collision detection with screen boundaries.
As we can see, we have made use of the “Game_Over” event we created earlier. This event will trigger the activation of the code block defined in Figure 13, which will be responsible for displaying the Game Over screen as well as stopping the game.
For testing purposes, it is advisable to add a 1 second pause just before checking whether the character is touching the obstacle or not, as sometimes the game places the protagonist off the screen, causing him to lose automatically.
OBSTACLE GENERATION
Now that we have defined all the basic elements of the game, we have to add the obstacles that the player will have to avoid in order to move forward. The challenge lies in making these obstacles generate at different heights in order to introduce more difficulty to the player.
Before procedural generation, we must program the obstacles to appear at the start of the game in a position away from the player to prevent the player from crashing by accident, but close enough to still be partially visible on the screen, in order for the player to visualise the future obstacle.
To do this, inside the pipe sprite, we add a block that will allow us to place our obstacle in specific coordinates, which we want to be executed from the very moment the game starts.
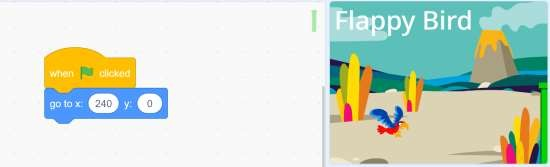
Figure 21. Initial obstacle generation.
A single pipe that does not move does not seem to be much of a challenge for the player, so we must generate an infinite number of pipes at different heights, which must approach the player with a certain speed.
But the pipes do not only originate from the base of the game, they must also appear from the top in order to create a narrow passage area for the player. As with our character, the obstacle sprite has two images or disguises, one with the pipe above and one with the pipe below.
As every time I create an obstacle I want to have both, to simplify programming, we will make use of Custom Blocks. In essence, it is a block that will implement more complex functions than Scratch has by default, in our case, it will create an obstacle at the bottom and clone it but with the Sprite of the upper obstacle.
First we will define the custom block as shown in Figure 22, where we will add a name and define a single variable called “distance” that we will use later.

Figure 22. Creation of a customised block.
Once the block is created, we define the instructions to be executed. First of all, we will show an obstacle which we will force to become one of the disguises, for example the one on the pipe above. After that, we clone the object and on that new cloned object, we assign the other sprite to have the pipe below.
This block must be executed at the moment the player goes from the menu to the game, so in case of receiving the “Start” event, we will hide the obstacle and call the create obstacle block we just created. Since we are interested in the game constantly generating obstacles, we will introduce this block inside an infinite loop, as shown in Figure 23, assigning, provisionally, the distance value to 0.
Figure 23. Implementation of the customised pipeline creation block.
As we can see, when we run the game we see that the pipes are joined together, which would prevent our character from passing through them. To solve this, we will modify the previous code to modify the height of each pipe randomly, but leaving a space of about 120 pixels between them so that our character can pass through them without any problem.
To do this, we only need to add a change in the Y-coordinate of both objects (the original and the clone), where the obstacle that is above, we will put as Y-coordinate the random distance value between 1 and 120 that we will pass as parameter of the custom block. To ensure a 120pixel separation between the obstacles, the second block will have a Y-coordinate = distance -120, as shown in Figure 24.

Figure 24. Generation of obstacles with random height.
Before testing this change, let’s introduce a delay of, say, 10 seconds in the main loop, so that we can visualise the effect. If we run the game multiple times, we will see how in each run, the height between the obstacles is different, but always maintaining that separation, as shown in Figure 25.
Figure 25. Display of change in height of obstacles.
Now that the obstacles are created and their height is randomly generated, we must move them to the player’s position so that he can avoid them. The problem lies in the fact that the obstacles are procedurally generated, and we will have to manage each of them individually. Fortunately, Scratch takes care of this management in a way that is transparent to the user.
The code to be implemented is shown in Figure 26, which will be executed each time an obstacle instance is created. As we want it to move constantly on the X-axis, we insert the displacement block into an undefined loop, in which we will move the obstacle.
To adjust the separation between obstacles, we must change the pause time between the creation of each obstacle. To introduce more difficulty, we will modify this time with a random number between two predefined values.
Figure 26. Displacement of obstacles.
But if we run the game, we will see that all the obstacles will accumulate on the left side of the screen (Figure 27).

Figure 27. Problem of accumulation of obstacles.
To solve this, we only need to detect when the obstacle reaches the left edge of the screen, to make it disappear automatically. To do this, we implement the code in Figure 28.
Figure 28. Solution to the accumulation of obstacles on the left margin of the screen.
At this point, we can define that in case our character collides with any of the obstacles, the Game Over screen is displayed and the game is over. At this point, it may be necessary to adjust the scale of our character or the height of obstacles to prevent our protagonist from constantly crashing.
To do this, we must modify the collision block we created earlier so that it also takes into account collision with obstacles, as shown in Figure 29.
Figure 29. Collision with obstacles.
FINAL DEtAILS
We now have a fully operational game, but we can add new features to enhance the player experience.
We will start by adding a sound effect every time our character overcomes an obstacle. To do this, we will use one of Scratch’s default sounds (Figure 30) and add it to our project.

Figure 30. Selection of an audio file.
To reproduce the sound when the player overcomes the obstacle, we must check if the obstacle is a little to the left of our character, which always occupies the same position on the screen, i.e. at the coordinates X=-110 Y=0. This is achieved by implementing the block shown in Figure 31, where taking into account that the sound should only be played once and that the obstacle moves in 3-pixel jumps to the left, we define a value over which we are sure that the obstacle will pass, in order to make the comparison, e.g. a value of -99.
Figure 31. Play sound when overcoming an obstacle.
As a last detail, we are going to add the player’s score, which will increase every time he overcomes obstacles. To do this, we must create a variable called “SCORE”, which we initialise to zero when the game starts (Figure 32). As we can see, this variable is automatically added at the top left of the screen.
Figure 32. Creation and initialisation of variable score.
This variable must be incremented each time the player overcomes an obstacle, or in other words, each time the previously defined sound is played (Figure 33).

Figure 33. Increase score by overcoming obstacles.
And with this we have finished our Flappy Birds style game, where as the player progresses his score will increase as shown in Figure 34.

Figure 34. Final Game Result.